
The site map is
relatively easy:
Add a new item – find
“Site Map” and accept the default name (Web.sitemap)
And put the following
<?xml
version=“1.0“ encoding=“utf-8“ ?>
<siteMap
xmlns=“http://schemas.microsoft.com/AspNet/SiteMap-File-1.0“ >
<siteMapNode url=“default.aspx“ title=“Main“ description=“First Page“>
<siteMapNode url=“frmPublisherList.aspx“ title=“All publishers“ description=“Publishers list“ >
<siteMapNode url=“frmPublisher_Insert.aspx“ title=“New Publisher“ description=“Add new“></siteMapNode>
<siteMapNode url=“frmPublisher_Edit.aspx“ title=“Edit Publisher“ description=“Edit“></siteMapNode>
<siteMapNode url=“frmPublisher_Delete.aspx“ title=“Delete Publisher“ description=“Delete“></siteMapNode>
</siteMapNode>
<siteMapNode url=“frmBookList.aspx“ title=“All books“ description=“Book list“ >
</siteMapNode>
</siteMapNode>
</siteMap>
( the names are pretty
suggestive – url, title and description)
Now it’s time to put
to work :
Open Book.master , and
put a site map control ( find into the navigation tab on toolbox) before content
place holder:
<asp:SiteMapPath ID=”SiteMapPath1″ runat=”server” Font-Names=”Verdana” Font-Size=”0.8em” PathSeparator=” : “>
<PathSeparatorStyle
Font-Bold=”True”
ForeColor=”#990000″
/>
<CurrentNodeStyle
ForeColor=”#333333″
/>
<NodeStyle Font-Bold=”True”
ForeColor=”#990000″
/>
<RootNodeStyle Font-Bold=”True”
ForeColor=”#FF8000″
/>
</asp:SiteMapPath>
And put a tree view
instead of right menu:
<asp:TreeView ID=”TreeView1″ runat=”server” DataSourceID=”SiteMapDataSource1″ MaxDataBindDepth=”1″>
</asp:TreeView>
<asp:SiteMapDataSource ID=”SiteMapDataSource1″
runat=”server”
/>
Now, if you run the
project, and press new button, you will
see the following
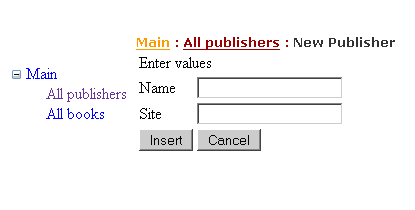
Sure that all books it
is not implemented yet – but it is your task to do it.
Now we will proceed to
the localization part. We want to be able that people see the content in
English and French.
We will localize just
one form, and we left the others as an exercise to the reader.
The setting of
language will be set in a cookie on the user’s PC and will be read each time.
Add a drop down list
to the master page, near Book application with the following code:
<asp:DropDownList runat=”server” id=”ddlLanguage” OnSelectedIndexChanged=”ddlLanguage_SelectedIndexChanged” AutoPostBack=”true”>
<asp:ListItem Text=”English”
Value=”en”>
</asp:ListItem>
<asp:ListItem Text=”French”
Value=”fr”>
</asp:ListItem>
</asp:DropDownList>
On the .cs page, let’s
store the actual configuration :
protected void
ddlLanguage_SelectedIndexChanged(object sender,
EventArgs e)
{
HttpCookie
cookie = Request.Cookies[“Language”];
cookie.Value = ddlLanguage.SelectedValue;
Response.AppendCookie(cookie);
cookie.Expires = System.DateTime.Now.AddYears(1);
Response.Redirect(Request.Url.LocalPath);
}
So we have saved the
value … now, let’s retrieve it:
protected void
Page_Load(object sender, EventArgs e)
{
if
(!IsPostBack)
ChangeLanguage();
}
private void ChangeLanguage()
{
HttpCookie
cookie = Request.Cookies[“Language”];
if
(cookie == null)
{
//set
default the cookie in web.config
string
s = Thread.CurrentThread.CurrentUICulture.Name;
cookie = new
HttpCookie(“Language”);
cookie.Value = s;
cookie.Expires = System.DateTime.Now.AddYears(1);
Response.AppendCookie(cookie);
}
foreach
(ListItem li in
ddlLanguage.Items)
{
if
(li.Value == cookie.Value)
{
li.Selected = true;
break;
}
}
}
Now we must change the
language : We can put this on each page, overriding InitializeCulture , or put
in a global.asax file( that retains the application events) on Application_BeginRequest:
( new item => Global
Application Class)
protected void Application_BeginRequest(object sender, EventArgs e)
{
string
lang = System.Threading.Thread.CurrentThread.CurrentUICulture.Name;
HttpCookie
cookie = Request.Cookies[“Language”];
if
(cookie != null && cookie.Value != null)
lang = cookie.Value;
System.Threading.Thread.CurrentThread.CurrentUICulture =
System.Globalization.CultureInfo.GetCultureInfo(lang);
System.Threading.Thread.CurrentThread.CurrentCulture =
System.Globalization.CultureInfo.CreateSpecificCulture(lang);
}
It is time now to
proceed to the localization
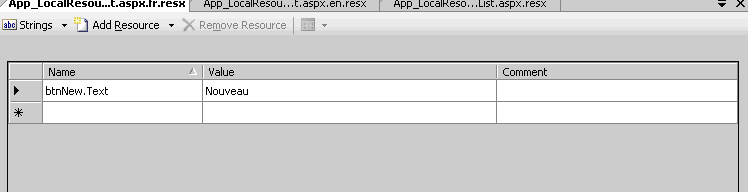
Add an Asp.NET folder,
named “App_LocalResources”
And in this folder,
add three resource files, named :
frmPublisherList.aspx.en.resx
frmPublisherList.aspx.fr.resx
frmPublisherList.aspx.resx
(The file name is
compose by the name of the aspx file + (optional) language + .resx )
In these files we will
add just one string for the Text property of the button that is new, like in
the figure:
Now, we put meta:resourcekey=”btnNew” on the button:
<asp:Button ID=”btnNew” runat=”server”
Text=”New”
OnClick=”btnNew_Click”
meta:resourcekey=”btnNew”/>
And we will see in
this mode the translation by changing from English to French in the combo.
Attention: if you do
not have the invariant culture file ( the one without language in the name) it
does not work!
If you have several
items that are invariant ( like the “save”
button) you can add resources to the special folder App_GlobalResources
and add there resx files ( that now can be named as you want to ) As example
suppose we have now in the App_GlobalResources the files
Buttons.en.resx
Buttons.fr.resx
Buttons.resx
And one resource named
btnSaveText
We can acces as so :
<%$
Resources:Buttons,btnSaveText%>
<asp:Button ID=”btnSave”
Text=”<%$
Resources:Buttons,btnSaveText%>“ runat=”server” OnClick=”btnSave_Click” />
Or , programatically,
by writing :
Resources.Buttons.btnSaveText
Next time we will look
at making a DOS project for the same application
Items to read:
Localization: http://quickstarts.asp.net/QuickStartv20/aspnet/doc/localization/localization.aspx
Master Pages:
http://quickstarts.asp.net/QuickStartv20/aspnet/doc/masterpages/default.aspx