
Now, it’s time to make
the ASP.NET application. I suppose that you have already installed Internet
Information Services (you will find in the Administrative tools folder) . If
not, please install and run aspnet_regiis.exe that you will find into
<WindowsPath> \Microsoft.NET\Framework\<latest version> (my path is
C:\WINDOWS\Microsoft.NET\Framework\v2.0.50727)
Install SQL Server
Express(<Address>) and WebDeveloper(<Adress>) – no install of SQL
because you have done this already.
Now it’s time to
import our data to the SQL Database. Start SQL Server Management Studio and you
will find the databases already installed.Create a new database (name: Book)
and import the mdb database into this new database. Right Click on Book =>
Tasks= > Import data .
In the first screen
choose as data source Microsoft Access
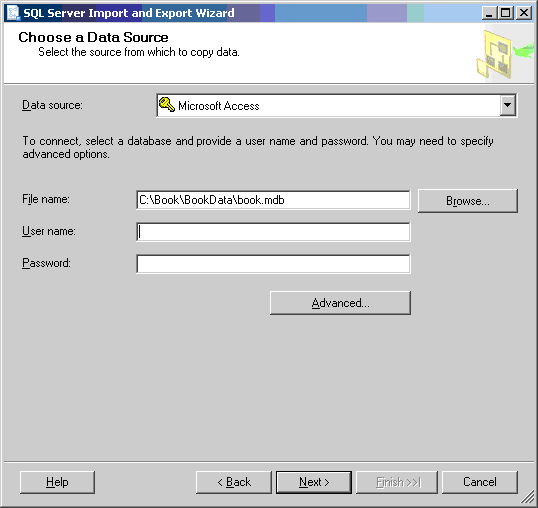
The next screen is
correctly completed – as you can, use windows authentication.
Choose next “Copy data
from one or more table or views” and click “select all” in the following
screen.
You can now press Finish
and make the task.
Some modifications are
necessary to be done:
Choose Book=>
Tables in SQL Server Management Studio. Right click Publisher table and press
modify.
We must make IDPublisher
an auto number like in Access, In SQL Server, auto number is named identity.
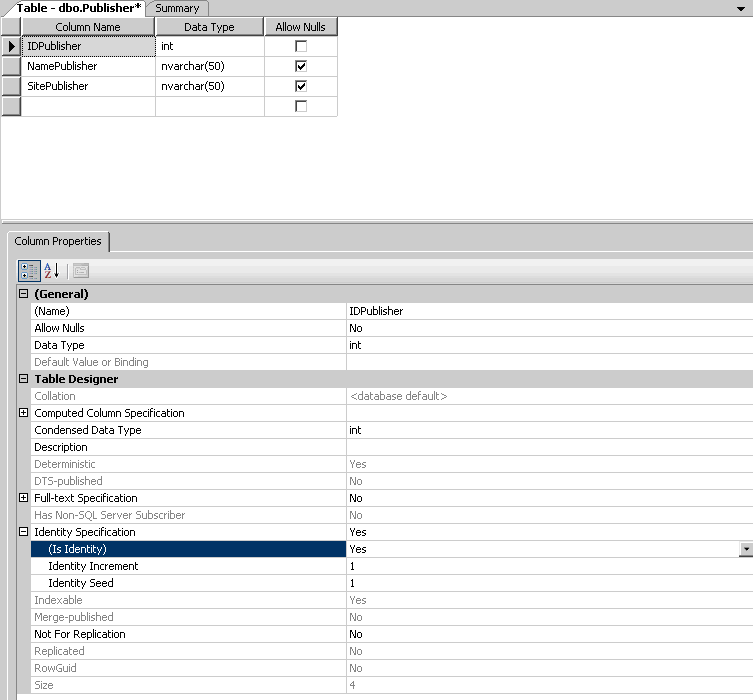
As you modify the (Is
Identity) property, you will see the identity incremend and seed to be modified
also in 1 and 1.
Save the table.
The next step is to
create a folder where we create the internet program.
Goto C:\Book and
create a new folder , named BookWeb
Now , from the Administrative
Tools folder double click Internet Information Services and expand (local
computer)=> WebSites=> Default Web Site.Right click Default Web Site and
choose New => Virtual Directory. Click next. In the Alias please enter
BookWeb. For the directory enter C:\Book\BookWeb .Press twice “Finish” and we
are ready.
Now we are ready to
program our first page in ASP.NET.
As usually we will
have a list page and create/update/delete pages for Publisher.To make the possibility
that the site has an unitary interface, we will create a master page
–Book.master.
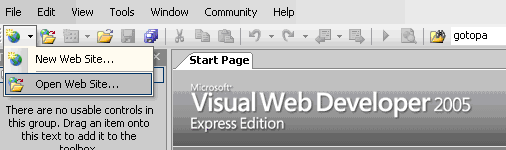
Open Microsoft Visual
Web Developer 2005 Express Edition and choose Open Web Site like in the image:
Choose “Local IIS” tab
and “BookWeb” as virtual directory
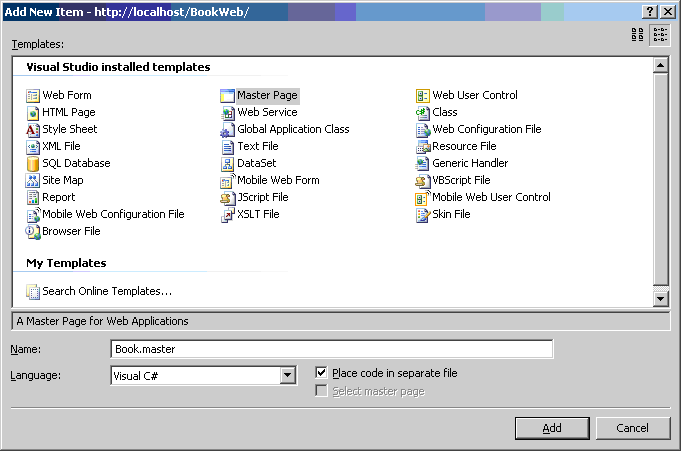
Now we will cre
In the “Solution
Explorer” right click the http://localhost/BookWeb
and choose Add new Item – and choose Master Page and name it
“Book.master”.Do not forget “ Place code in separate file”
The interface of the
master page will be rather simple : a
table that has 2 rows and 2 column , the upper row being an unique cell
The content is here:
<%@ Master Language=”C#” AutoEventWireup=”true” CodeFile=”Book.master.cs” Inherits=”Book” %>
<!DOCTYPE html PUBLIC “-//W3C//DTD XHTML 1.0 Transitional//EN” “http://www.w3.org/TR/xhtml1/DTD/xhtml1-transitional.dtd”>
<html xmlns=”http://www.w3.org/1999/xhtml”>
<head runat=”server”>
<title>Untitled
Page</title>
</head>
<body>
<form id=”form1″ runat=”server”>
<div>
<table width=”100%”>
<tr>
<td colspan=”2″ align=”center”>
Book application</td>
</tr>
<tr>
<td width=”10%”>
Right menu
</td>
<td>
<asp:ContentPlaceHolder ID=”ContentPlaceHolder1″ runat=”server”>
</asp:ContentPlaceHolder>
</td>
</tr>
</table>
</div>
</form>
</body>
</html>
Now the list page.
Add a new Item – Web
Form(frmPublisherList.aspx) – and make sure that you have checked BOTH
checkboxes. The next dialog shows you the BookMaster that you must select and
then press OK.Right click on the file and choose “Set as start page”
In the asp:content tag
drag a gridview ( found in Toolbox=> Data) .
This gridview must be
filled with data – so we will connect to the objects that we have created. Here
is a problem – how we can found if we create for the dll a Debug or Release and
bind to the apropiate folder ? The solution, as always in programming, is
indirection : make a new folder , bookdll and we will copy here the sources,
independently of debug or release.
So we create the
C:\Book\BookDll , go back to the Book solution and on Build Events copy the
sources in the BookDll folder and put this line in the Post build command line:
copy
$(TargetDir)*.* $(ProjectDir)..\BookDll
/Y
Compile the project.
Now you will find in
the C:\Book\BookDll folder the BookObjects.dll
Add a reference to the
BookObjects.dll in the BookWeb application( old story : right click http://localhost/BookWeb project, choose
add reference, click Browse tab – and navigate to the C:\Book\BookDll folder.
On the frmPublisherList.aspx
press F7 and put this lines into the Page_load event
if (!IsPostBack)
BindData();
The BindData function:
private void
BindData()
{
BookObjects.ColPublisher
publishers = new BookObjects.ColPublisher();
publishers.Load();
grdPublisher.DataSource = publishers;
grdPublisher.DataBind();// main difference ASP and Windows forms – this call
}
Now
, if you run the project, an error will occur : Object reference not set to an instance of an object
This is because we do
not add yet the web.config with database connection.add a new web configuration
file ,named default Web.Config, and in the connection strings put this:
<connectionStrings>
<add name=“SQLServer“ connectionString=“server=.;Trusted_Connection=true;database=Book;“/>
</connectionStrings>
And we must specify
that we connect to the SQL .
<appSettings>
<add key=“DatabaseUsed“ value=“SQLServer“/>
<!– possible values : MDB, SQLServer–>
</appSettings>
Now press again
CTRL+F5. The error that you have now is
Cannot open database “Book” requested by the
login. The login failed.
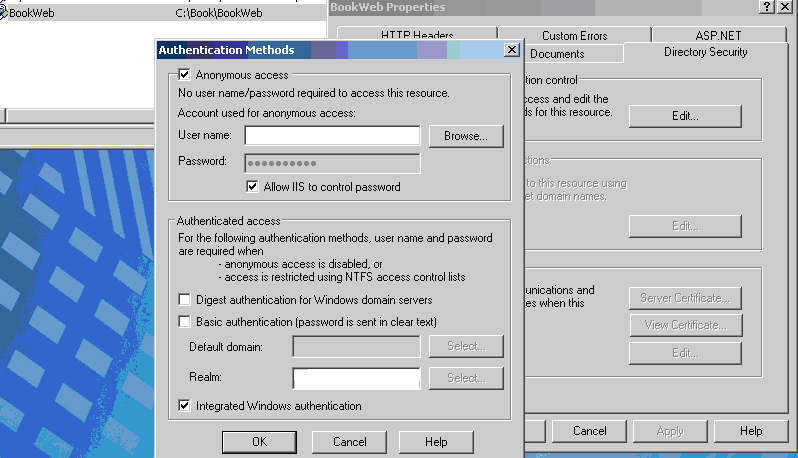
Login failed for user ‘<PCNAME>\ASPNET’.
Why
this error? Remember that we have put Trusted_Connection=true
in
the web.config. So the user that is connecting is the user that runs the site.
We
have more solutions :
1) Use in the
web.config a connection with user name and password (good for Internet sites)
2) Run the
site on other credentials for anonymous( good for internet/intranet sites) –
option made in IIS like in image
3) Disable
anonymous and use “Integrated windows”
in collaboration with a setting in web.config file, <identity
impersonate=“true“/>( good for
intranet sites )
4) Create a
SQL Server user for the credentials user(IUSR_ )that has rights on the
database.
You
can make your choice…Personally, I prefer the first solution.
OK.The
next time we will see how to insert data on the SQL database.
Recommended